Monday, August 25, 2014

Don't dread the price of the dead! The Walking Dead: Season 2 Giveaway!

 Have you maneuvered your way through the zombies and hardships of the first season, yet still remain without season two in your inventory? Well, if you have Steam, here's your chance to acquire it. The final episode releases tomorrow and no one should be left unprepared for the zombie apocalypse. Ready yourself with the emotional roller coaster of The Walking Dead: Season Two as it continues the riveting story from the first season.

 Steam is a requirement, my apologies to those who don't have it, I promise more giveaways relatively soon.

 Now, the only thing left is to send an e-mail to: giveaway@madam-geek.com

 A winner will be selected at random tomorrow (August 26th) at 3 p.m. PDT, and I will contact them via e-mail.

 This is a big thank you to those of you who have been visiting the site, I've officially gotten over 1,000 page views and appreciate every single one of them. :D

Friday, August 22, 2014

Can't hate Loot Crate!

Since I first laid eyes on that beautiful bounty of nerd goodies, I’ve wanted to acquire my very own Loot Crate. This month, I equipped my Amulet of Mara and committed.


Allow me start by saying that Loot Crate appeals to the frugality in me. Roughly $20 (including shipping) for $40+ worth of assorted geeky items? Yes, please! In addition to the already fantastic price for the budget conscious, a promotion code for a discount is ever present that can be found on their facebook page.


My experience started when I ordered the August Crate on the last possible day for orders. With my order placed on the eighteenth, I received tracking information the next day. As lightning fast as that was, it arrived two days later! I felt as though Barry Allen had hand delivered my goods.


Now for the goodies! As I popped open the box, I laid my eyes upon the epic loot drop that fall before me. 

First impression: Guardians of the Galaxy and Teenage Mutant Ninja Turtles!? Loot Crate wins all the internets! The art on the inside box is spectacular and fits the items perfectly. Though it doesn't appear to have much more than those few things.

 To quote Thorin about that last part: I have never been so wrong in all my life. So much is packed within this tiny box!


 Loot from the August Crate: A Loot Crate exclusive glow in the dark POP figure of Groot, Kidrobot Ooze Action glow in the dark Teenage Mutant Ninja Turtle figure, TMNT glasses that resemble the masks worn by the turtles, shoe accessory called Shwings, Mega Man air freshener, Deadpool cereal box magnet, digital download codes for in game loot, a Loot Crate pin, even a booklet with information about Loot Crate and the items within it!


Overall, Loot Crate exceeded my already heightened expectations. The exclusive Groot figure alone was worth the price in my opinion, but the total of these items well exceeds $20. An additional perk to Loot Crate is that it contained things that I enjoy but did not know existed, or might not go out of my way to find.

Last but not least, information. I will post the website for Loot Crate here; however, I will ask, pretty please with glowdust on top that if you order that you use my link! I would greatly appreciate it. Additionally, use this promo code to save $3 off your first month's subscription: save3. The only thing left to say is: Woot for Loot! 

Loot Crate!

Madam Geek's link!

Saturday, August 16, 2014

Iron Boots as light as a feather!

Stomping around a convention all weekend in hefty iron boots sounded about as appealing as the water temple itself. With that in mind, the task of creating comfortable, light boots that could endure a weekend in a highly populated area was added to my quest log. This post will be picture heavy because visual aids are quite helpful in explaining these things, click on any pictures to enlarge them. First step, gathering supplies.


Supplies:
Brown boots
Pen
Paper
X-acto or similar
Ruler
Two pieces of craft foam (foamies, color doesn't matter) 12" x18"
Hot glue gun and glue
Wire (16 or 18 gauge picture wire)
Plasti-dip (black, spray)
Rub-n-buff (silver)
A sock (doesn't have to be new)
Velcro (1" squares)


Tip: Use craft store coupons to your advantage. Michaels, Joann’s and Hobby Lobby all have weekly coupons of usually 40% off one item.


New game? ►Yes    No


Begin by drawing a line along one edge of the paper with your ruler about the size you want the side of the iron on the boot to be, I made mine an inch. At the center of this line, draw a shape similar to a plateau with rounded edges. For a better grasp on the shape, I provided a picture below. Cut the design out and hold it up to the back of your boot to get a feel for the size. If needed, repeat with adjustments until you’re happy.


Then, trace the paper design onto the craft foam in the center of the longest side of foam. Cut the design out and instead of cutting at the edge of the paper pattern, cut all the way to the edges of the foam to create lengthier strips along the sides. This will make it easier to size after you get them on the boots.


Now, take the wire and bend it to roughly sit about ¼” to ½” inside the edge of the plateau shape. Trim the wire to fit, then use a considerable amount of hot glue gun to secure the wire in  place. Be careful, the wire will become hot to the touch the longer there is heat applied to it.


After letting it cool, you will be able to bend the wire to shape the foam piece to sit around the back of the boot. Don’t worry about the sides for now. Let’s move on to the front piece.


Using paper again. Draw out the shape of an eye, oval-like with points. (I believe the shape is called a 'lens'.) Make one arch larger than the other. Like with the back piece, cut it out, check the size against the boot that you'll be wearing. Once you're happy with the size, transfer it to foam and cut it out.

As you did with middle of the back piece, shape and cut wire to fit along the larger arch, and glue it down. This is a great time to label each side for the coordinating boot. After drying, shape it to fit over the toe of the boot. Leave a gap between the bottom of the foam and where the boot sits on the ground. Preventing the foam from actually touching the ground adds durability.

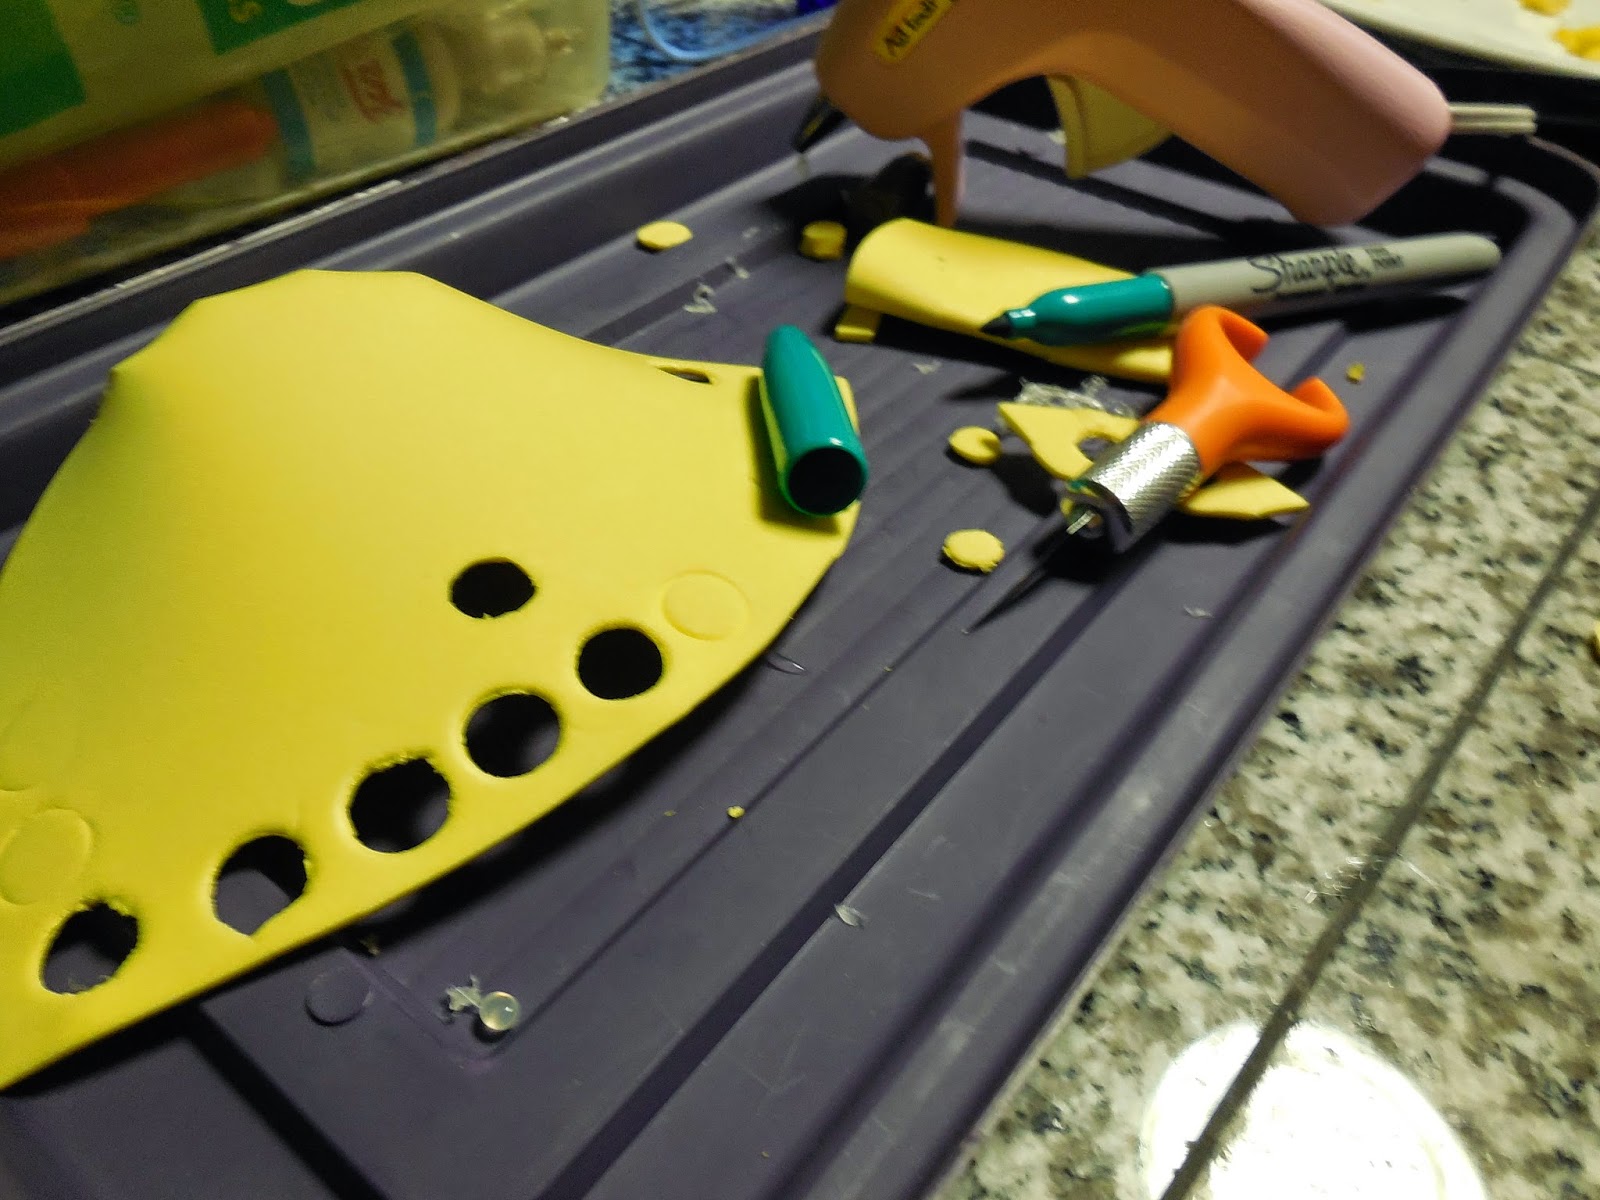
Creating the rivets seemed like quite a daunting task at first. How many tiny circles did I have to make relatively the same size? Fear not! I found that using the lid of a sharpie pressed down on a hard surface with craft foam in between and a little twisting back and forth did the trick!


After cutting a few out, place them along the foam pieces while they sit on your boots. Try different spacing to figure out the desired look. I ended up needing around thirty pieces for my boots. This will vary by the size of your foot. Place dots along the foam pieces where you wish to place your rivets.


Finally, when you've cut out more circles than can fit in your inventory, get to gluing! Use your dots for reference and place a small sphere of glue in the center of each rivet. You'll have a split second before it hardens to move the rivet slightly if it needs a bit of adjustment. 


Next, in a WELL VENTILATED AREA coat the pieces using the Plasti-dip spray, wait at least twenty to thirty minutes between coats. Be sure to coat as much surface area as you can, try not to coat too heavily. Many light coats are better than a couple heavy ones that get smudged. As each coat is applied, the foam will become less porous. In the picture below: On the left, after the first coat, still noticeable pores and spots that need covering. On the right, after the fifth coat the foam looks more uniform, very little visibility of pores and it will no longer absorb paint! 


 Now, how do you get that brand new iron look? Rub-n-buff! First! This is important! Decide one direction to paint back in forth in. Stay consistent. This helps give each piece a uniform look with the other. Don't be alarmed if one or two strokes goes awry, it happens, it's not the end of Hyrule. 


 Grab the Rub-n-buff, a piece of foam, the old sock, a paper plate or cardboard box (for excess, I used an old board). You'll need a sock that has this texture on the inside of it, instead of a brush this will be your painting tool.


Turn the sock inside out and place a dab of rub-n-buff on the sock and begin rubbing the excess off so there is more distribution among the sock's surface. Start moving the sock in the direction you chose and gently apply pressure to the foam. The lighter the better at the beginning. You want some of the black to show through the silver, don't try for full coverage. Don't worry about filling in to the very edge next to the rivets, a little extra darkness creates a shadow effect. Not to mention, you don't want your rivets falling off because you're brushing over or on them too hard. Some imperfection adds a gritty and real feel, so never worry about that.

Let your iron dry! I live in a warm, dry place, so mine dries faster than you can say HYAAAAAH! Though, it won't take long. After it's dry to the touch, you can get to attaching them to the boots!


You'll need six squares of velcro and a pair of scissors. Cut two squares in half, these will be used for the sides. Reminder, you don't want your foam touching the floor, you want it to float slightly. Peel the backing off of both pieces and apply the stiff (non-fuzzy) side to the boot. Take the foam piece that fits over the toe and press it on, hold it there for a moment. Do the same with the center of the back piece along the back of the boot. Repeat with the halves, one for each side. Place these towards the front of the boot, but layer them underneath the toe portion.


To remove a piece, reach under the foam and carefully pull the velcro that is attached to the foam away from the other. Do not just rip or pull it. I was as anxious about how durable this approach would be as I was the first time I faced Ganondorf. Occasionally, another convention attendee would bump my boot and I'd hear the tearing of velcro. My heart sank at the sound of what I assumed was my failure; however, they remained intact! Instead of ripping the foam, the velcro had enough surface area to hold on yet move around. By the glory of Nayru, Din and Farore these boots lasted me all weekend!

Here are a few pictures of the completed boots! Also, a shameless picture of my cosplay in it's entirety. If you want to make these or are attempting to and you have any questions, feel free to ask me! Comment, send me a facebook message or an email, I'm more than happy to help.


Wednesday, June 18, 2014

Misadventures of Phoenix Comicon!

As opposed to last year when a piece of the triforce fell off my shield, everything remained intact and attributed to a fantastic time at Phoenix Comicon! This convention brought numerous firsts to my cosplay experience. The blonde mop for my Link costume proved to be not quite as daunting as I previously anticipated for my first wig. I was photographed in costume and put into a few website galleries this year, which is a new step for me. Last but definitely not least, I fabricated my own costume this year.


Let’s start at the beginning, I became determined to work on my own costume entirely this year. Last year my wonderful Mother ‘helped’ make my green tunic. By helped I mean, became a sorceress with a sewing machine to create it out of fabric and no pattern. But hey, I made the hat! This year, I found a pattern, adjusted it accordingly, and began leveling my sewing skill. With a few pointers here and there from the master, I had successfully crafted my first tunic! Next, countless hours spent on search engines and tutorials ensued to figure out the best way to make Iron Boots and bracers (and eventually the hilt of a the master sword). Being the hero of time did not help as much as I had imagined it would. What seemed like endless hours passed in the Arizona heat working with foam, plasti-dip, and dark magic.. I mean spray paint. The experience provided me with a feeling of accomplishment and gratification unlike any other. My Link costume turned out as I had envisioned, and even better when assembled entirely.


This lead to another satisfying occurrence, unimaginable appreciation. While walking the floor of the convention I observed various other Link’s and got the pleasure of chatting with quite a few of them. Geeking out with like-minded people is one of my favorite parts of going to a convention. Exchanging information on materials, and complimenting props. Next year my costume will be even better thanks to the imaginative ideas I gathered.


In addition to conversing with fellow Heroes of Hyrule, several people wanted to take a picture of/with me which left me ecstatic and proud of the job I had done. One highlight of creating and portraying a beloved character is the recognition from others. My heart melts faster than ice cream dropped on hot pavement when a small child wants to take a picture by my side. To witness smiles creep across the faces of fellow nerds as they pass by fills me with pure bliss.


On Friday evening, I had the satisfaction of attending Geek Prom. Geek Prom was an event much like any other dance, only catered to geeks! Nearly everyone attended in costume, and busted out their best dance moves. Surrounded by peers, I showed off my best sprinkler, cabbage patch and running man. Practically everyone jumped to their feet to partake in the Time Warp. Not a shred of judgment was shown, no prom drama, only good times. Geek Prom proved to be one of the most uplifting moments of my weekend.


How could I skim over one of the best parts? The panels! One that I attended which wasn’t part of my original schedule was Manu Bennett who proved to be an absolute blast to witness. His charm and wit paired with humorous stories from his acting career made for an extraordinary time. A few highlights included: the time that he practiced a scene from Arrow in which he accidentally choked a guy out, and inviting fans up on stage while teaching them a haka (a traditional ancestral war cry, dance or challenge from the Māori people of New Zealand). Meanwhile there’s one mandatory panel that I view every year, John Barrowman. That enthusiastic, delightful man always brings a grin to my face and an unfiltered cackle from my core. From tales of his marriage to behind the scenes moments on a variety of shows, Barrowman remains an utter riot.


Lastly, an essential subject to note on: my significant other. As enjoyable as Comicon always turns out, it would not have been as stellar if not for him. My bracers needed lacing, my boots needed fixing, and I needed a level head which at times it was hard to maintain. Being fast-paced and crowded, Comicon can be a lot to handle. Honestly, being quite shy, I’d have never braved Geek Prom alone. My player two helped me unwind after every day of attendance. Sharing the experiences of Comcion and geeking out with someone close who will alert you to a temporary flaw in your cosplay to which you can do the same is like the cherry on top of the sundae of Comicon.

In summation, Phoenix Comicon brings new, thrilling adventures each year. Despite not making it into Nathan Fillion’s panel after a lengthy wait in line, the convention turned out spectacularly. Left with a feeling of geek satisfaction and overall exuberance, the event came to a close. Back to the days of being Alicia/Madam Geek and no longer Link or Jayne until next year.

Thursday, May 22, 2014

Geek Culture

I could have bought a Warhammer 40k army with the
amount of hockey gear I own.
  Geek culture is by far one of the most unique ones in existence; however, that does not make it flawless. Geek, by definition, means: a person who is very interested in and knows a lot about a particular field or activity. In other words, nearly anyone walking the face of this earth is a geek! 

  I, personally, have a myriad of interests. I am a: video game, car, art, film, and hockey geek just to name a few. Through all walks of life there are many geeks among us. In this post, I’d like to explain a few negatives that geeks should all work to improve. On the other hand, I aim to shed some light on fantastic features of the geek community. 

  As with any culture, it has its share of imperfections, although I will focus on a select few. Ethnocentrism ( judging another solely by the values and standards of one's own culture) remains a hindrance in the acceptance of new geeks. A demonstration of Ethnocentric behavior would be the judgement of another player of an MMO because they did not play since Beta or long time Doctor Who fans treating newer fans differently because they have started with the Ninth doctor as a opposed to the First. While a common interest is present, the person who has dedicated more time perceives themselves as a ‘true geek’.

  Elitism (a person having, thought to have, or professing superior intellect or talent, power, wealth, or membership in the upper echelons of society) runs along the similar lines.I have, as many of you as well, have faced elitism first hand. My experience began in high school for theater in my freshman year. My naive mind lead me to believe that I would be accepted with open arms. This was not the case. No matter the acting prowess any underclassmen had shown, they were merely cast as extras and smaller speaking parts. While freshmen tried to integrate themselves into the the group that they finally felt they belonged within, seniors wanted nothing to do with them. The notion being that the freshmen weren't worth a moment of their time.

  Additionally, an issue I am personally knowledgeable on is sexism (prejudice or discrimination based on a person's sex or gender). For example, “Your boyfriend must be playing the game for you” for women to “You've probably never even been on a date” for guys. Countless jabs have been taken at many geek’s intelligence, skill, or life experience based purely upon gender. Finding enjoyment in both prancing around in pumps and lacerating locusts on Gears of War is possible. Likewise, your local Dungeon Master may go home to his long-term girl(or boy)friend after a long day of placing players in turmoil. 

  Switching gears, an abundance of wonderful traits exist to contrast the negatives. Camaraderie blossoms in geek culture unlike any other. A simple common interests sparks some of the most intense and intriguing conversation. Likewise, geeking out over a subject can subsequently lead into obtaining a new friend or more. 


The day after I learned Magic The Gathering, I
destroyed my teacher.

  Ever wonder what it’s like to play Dungeons & Dragons? Or if Wolverine’s adamantium claws would pierce the Hulk’s skin? (They would, by the way.) Find someone who’s passionate about it! Geeks find gratification in teaching or explaining things to an interested party. Rambling on about a passion is an absolute delight. Let them teach you how to play a new tabletop game, or explain the inaccuracies in the latest blockbuster hit from it’s source. Furthermore, incredible creativity emanates from geeks. Fan art, cosplay, and fanfiction are prime examples. 

  Fan fiction takes a story beyond the author’s intent. Harry Potter continues on beyond book seven; however, not written by J.K. Rowling. Devoted and imaginative fans envision a continuation and invite fellow Potter lovers to take a peek into the possibilities. Meanwhile, those who fell in love with the characters of their favorite anime or video game, show tribute by creating costumes. 

  Cosplay has blossomed into an art form of it’s own. Traditional versions of the a character are shown in meticulous detail, or original and inventive ideas are displayed. With examples of steampunk Link from Legend of Zelda to gender-swapped Han Solo it goes to show the creatives minds that lie inside of geeks. 

  In conclusion, geeks are an extraordinary and unique bunch. A post such as this is not meant to serve as a blanket list of traits that all geeks possess, but instead look at the culture as a whole. My advice to any of you who know fellow geeks or you yourself participate in any of the negative traits is this: Instead of condemning the person who adores the Eleventh Doctor because they have yet to watch Nine or his predecessors, hear them out or accept their opinion. Take enjoyment in the fact that other Whovians exist and then decide who will be the companion. A healthy debate is always an option as well, as long as it doesn't evolve into cheap insults. 

Hippy time.

Let’s just all get along, and live side by side in harmony with thy fellow geek.

Tuesday, May 13, 2014

Archery!

Disclaimer: In no way, shape or form am I an expert in the way of archery. (Even though I shot a zombie in the head as if I were Hawkeye. Continue reading for more information...) This merely details my first experience.


Last weekend I channeled my inner Link, Legolas and Mulan (post-training) to learn archery!


Let me begin with the path leading to this grand experience. I purchased a Groupon for an archery lesson for one or two people at Archery Headquarters in Chandler, AZ which included an ‘Intro to Archery’ lesson, no equipment fee, and a bit of free time to shoot.The going rate of the class I attended is $25 for one person, seeing as how Tauriel, and Link are some of my favorite characters, making the decision to pay the fee was an incredibly easy one. The overall experience with this business was marvelous. The instructor was phenomenal, the equipment and facility was clean and well kept, and making the appointment was easy.


As I arrived at the range and saw the targets, my excitement began to boil over like an unsupervised pot of ramen. I’ve always wanted to learn how to shoot a bow for either hobby, or survival benefit. When the zombie apocalypse happens, I’d like to know that I have the skill to wield a weapon that won’t make an echoing blast.


The instructor thoroughly explained the commands of the range and taught us the proper stance. After going over how to nock (or ‘load’) an arrow and draw, we were summoned to the line to begin shooting. As round after round went by and helpful tips were mentioned, we were given balloons to put on our targets.


Being competitive in nature, I had to massacre that little rubber housing of hot air. Soon, our quivers would be out of arrows and we began round two of attempting to slay the foul beast. I quickly realized that the only ones left with a balloon was myself and the seven year old to my right. Who, upon noticing the same thing, said,”I think they gave the big ones to the smaller people.” Eventually, that satisfying burst of air escaping it’s stretched out prison left me elated.


Was it time for my second rubber victim? Oh no. The instructor revealed our next targets to be zombie busts, and gave us a challenge after separating us into groups. The dream team assembled. While taking turns, as children’s shows have taught me since I was five, we released arrows into our braindead prey. Feeling accomplished after various headshots, we learned that we had lost the game. Did it matter? No. However, as with any sport, a bit of friendly competition is fun.


There are numerous tidbits of new information that came along with this fun filled day. While learning archery may seem like a daunting task, it is a lot easier than expected. That being said, don’t be deterred from giving it a go simply because you don’t believe you can do it. Archery does work your arm, back and shoulder muscles; however, take it from this noodle arm wielding blogger, don’t be intimidated.

I didn’t believe I’d be strong enough to draw a bow, let alone hold steady enough to aim; yet, above is the evidence that spaghetti arms can be lethal. Stance, follow through, and breathing are all vital elements to shooting well. At first I kept forgetting to follow through and once I released my arm fell limp, causing my aim to suffer. Having an absolute blast with this experience sparked my interest in archery a bit more, and in turn I began researching equipment. Compared to other sports, archery is fairly priced. Though a beginners bow will run you at least $150, and that’s just the bow.

The feeling of readying an arrow and letting it fly to witness your budding skill is one of a kind. Though I had a feeling this would be a great experience, I was unaware of how enjoyable and unique it would turn out to be. I was equally oblivious to the interest that would be launched to explore more about archery as a hobby. As I walked through the door of the range and back out into the world, I felt a little more prepared for survival situations and had a new hobby to research.

Sunday, May 4, 2014

The Wolf Among Us Review


Price: $$$$
Rating: Mature
Platform: PC, Xbox 360, PS3, PS Vita
Replay Value: Moderate
Enjoyment: 4/5


Who’s afraid of the big bad wolf? Not you, because you are him in The Wolf Among Us. This game from Telltale (the creators of The Walking Dead game) immerses the player in an entirely new view of some favorite fairytale characters. Notable appearances range from stories such as Beauty and the Beast, Snow White, Alice in Wonderland and even Little Red Riding Hood. The story unfolds in Fabletown which is modern-day Manhattan, New York, during 1986. Fantasy characters, or “fables”, are not the only inhabitants. The native humans are known as “mundies”, and to hide their real identity every non-human looking fable must purchase enchantments to blend in. The protagonist of this game is Bigby, aka the Big Bad Wolf. Bigby is the local sheriff of Fabletown who helps maintains the town's normal appearance as to not blow their cover. All the while, trying to contain and move on from the monster he once was.


Most of this game at surface level is influenced heavily by the fantastic work that Telltale has done with The Walking Dead. The art has the same cel shading style which meshes well with this games comic book roots. The player is presented with dialog and combat choices as well as a countdown to create real-time reactions. As decisions are made, small text appears in the corner of the screen occasionally, to remind the player that their choices have an effect. Every decision changes the players relationships with other characters. At the heart of countless decisions you can choose to be a good cop or bad cop. However, at times the line becomes fuzzy and it comes down to the lesser of two evils.


There were numerous aspects which contributed to my falling head over heels for this game. Storytelling helped me fall further into the rabbit hole that is this game. The constant action means no looking away, even if only for a moment, and loving every minute of it. Instead of a shining, happy side of the characters from tales we all know, some gritty and dark versions are brought to light in a new way. Something that differentiates this game from The Walking Dead, despite it’s similarities, is the action. There is much more combat; yet, it does not take away from the story in the slightest but enhances it. The feeling of having a physical presence in game, as opposed to just your words, is exhilarating.


However, being enamored with this game did not take away from the few noticeable flaws. The game being episodic is one of the few cons to the overall experience, waiting for the release every month becomes torture for those ingrained in the story. Each episode begins with a refresher of the story so far, but at times it seems a little lackluster and unfulfilling. Another element that pulled me out of the in depth experience of this game was an issue with frame rate. Although this may be an issue on my personal computer's performance, after further investigation, I found that many others had issues with this as well. A skip here and there really took away from the story having a hold on me.


Overall, Telltale did a spectacular job of tearing this story from the pages of a comic book and bringing it to life. The action, story and unique view of characters that we all know from tales prior brings a new and refreshing experience to gamers. While frame rate and the inevitable wait for new episodes to be released (for those playing the game currently) are a downside, these minor drawbacks won’t ruin the game. I strongly suggest this game for anyone who enjoys an in depth story with rich characters and the ability to take action when needed.

Tuesday, April 22, 2014

Google Chromecast Review

Pros:
  • Simple setup
  • Wireless casting
  • Cast a tab or desktop
  • Multi-device support
  • Numerous supported apps
Cons:
  • No security
  • Requires power
  • Casting only from Google Chrome browser or supported apps
Price: $$$$

Bottom Line: Buy

Tired of being huddled around a computer or smartphone to watch that cute cat video? Well huddle no longer! For only $35, Google Chromecast is a small device that plugs into an HDMI port on whichever desired t.v. to stream video and audio wirelessly. After installing the app and some simple setup for the device, you’ll be streaming in no time.

Once you’re all set up you can begin streaming from various apps that support Chromecast (Netflix, Hulu, HBO Go, Youtube, Pandora, and more). However, if you’re streaming something from another site while using the Chrome browser, there’s an option to cast your current tab. Currently, there’s an experimental feature in which you can cast your entire screen. As long as a device is supported and connected to the wi-fi network associated with the Chromecast, you can stream from it. Not to mention, after steaming begins you can start multitasking on your computer or smartphone. That means you can check out pretty nifty blogs while watching your favorite videos! Just sayin’.

Now that I’ve mentioned all the nifty features and uses, I’ll note on some things that you should know before getting this device. There is currently no security, anything connected to your wi-fi network can cast if it’s a supported device. Steaming will be affected by your internet connection and your device performance. In my experience, you cannot stream full screen games when casting the entire screen. There is no support for any browser other than Google Chrome. The device needs a power source, it comes with a USB cord. My television didn’t have a USB port in the back, but it also came with a wall adapter, so plan on having a plug free if you need it.

Overall, I really like this device and use it frequently. I stream Netflix while multitasking constantly. In fact, I’m watching Sherlock as I write this post. The ease of taking it from room to room and hooking it up to any t.v. is nice. It’s not as useful as I had hoped for streaming a game onto the television, but that really doesn’t put a damper on this device considering that’s not what it was made for. I find Chromecast to be wonderful for streaming at an affordable price. Now, back to building my empire in Minecraft while catching up on t.v. shows!

Thursday, March 13, 2014

Nerdy Picture Frame

Materials:

  • Frame ($1)
  • Scrapbook paper ($0.30-1) 
  • X-acto knife ($3) 
  • Desired photo ($0.30) 
  • Pencil 
  • Ruler 
  • Tape or glue 
  • Circle cutter (optional) 
  • Something to cut on


First and foremost, decide what your subject will be. I've always had a love for the Adam West version of Batman. So, what weighs six ounces, sits on my desk, and is dangerous? The finished product of this craft. Now, gather the supplies in your utility belt and let’s get rolling like the Batmobile!


To get started, you’ll need to cut the scrapbook paper down to the size of your frame. Either trace the size of the glass on your paper, or measure it. You could use any kind of colored paper, but I prefer scrapbook paper because it’s durable and comes in a variety of colors and textures.


Once you've done that, you need to trace out your design on the back of the paper. Make gridlines if this helps. Remember to sketch a vertically flipped version of the design if the one you've chosen is not symmetrical. My bat symbol made this easy.


Cut along the sketch lines with the X-acto knife or a circle cutter; make sure to have something under the paper that is durable. The first time I dealt with cutting through paper, my tabletop ended up slightly resembling the Joker’s face. Generally, I place a layer or two of craft foam that I have sitting around underneath. If the edges are rough when you’re finished, just smooth them out a bit with something rounded.


Next, to get your picture adjusted and printed. I couldn't find a good plain Adam West for the layout I was making. Resize or crop to what you think will work with the shape of the cutout you just finished. After you've found the chosen one, print it out! I've found that 4 x 6 prints sometimes work for 5 x 7 frames with a little positioning because of the cutout.


Almost done! Tape or glue your picture to the cutout. I like tape since you can re-position it if you don’t like the setting or even change the picture; however, if you do this keep in mind that the tape may leave residue, so try to make sure it’s at the edges where you can remove it if needed. You may need to snip off some edges if they spill over the paper so that it can fit in the frame.


Finally, place it into the frame and voila! You've got a new addition to show off your nerd passion. Even now, Batman is sitting beside me, watching on as I type. I may or may not wink at him from time to time while I’m being productive.


As always with crafts, don’t be afraid to expand this idea! Put your own art in the cutout instead of a print. I made a set of these involving each of the Lantern Corps. I’d love to know what you come up with!